

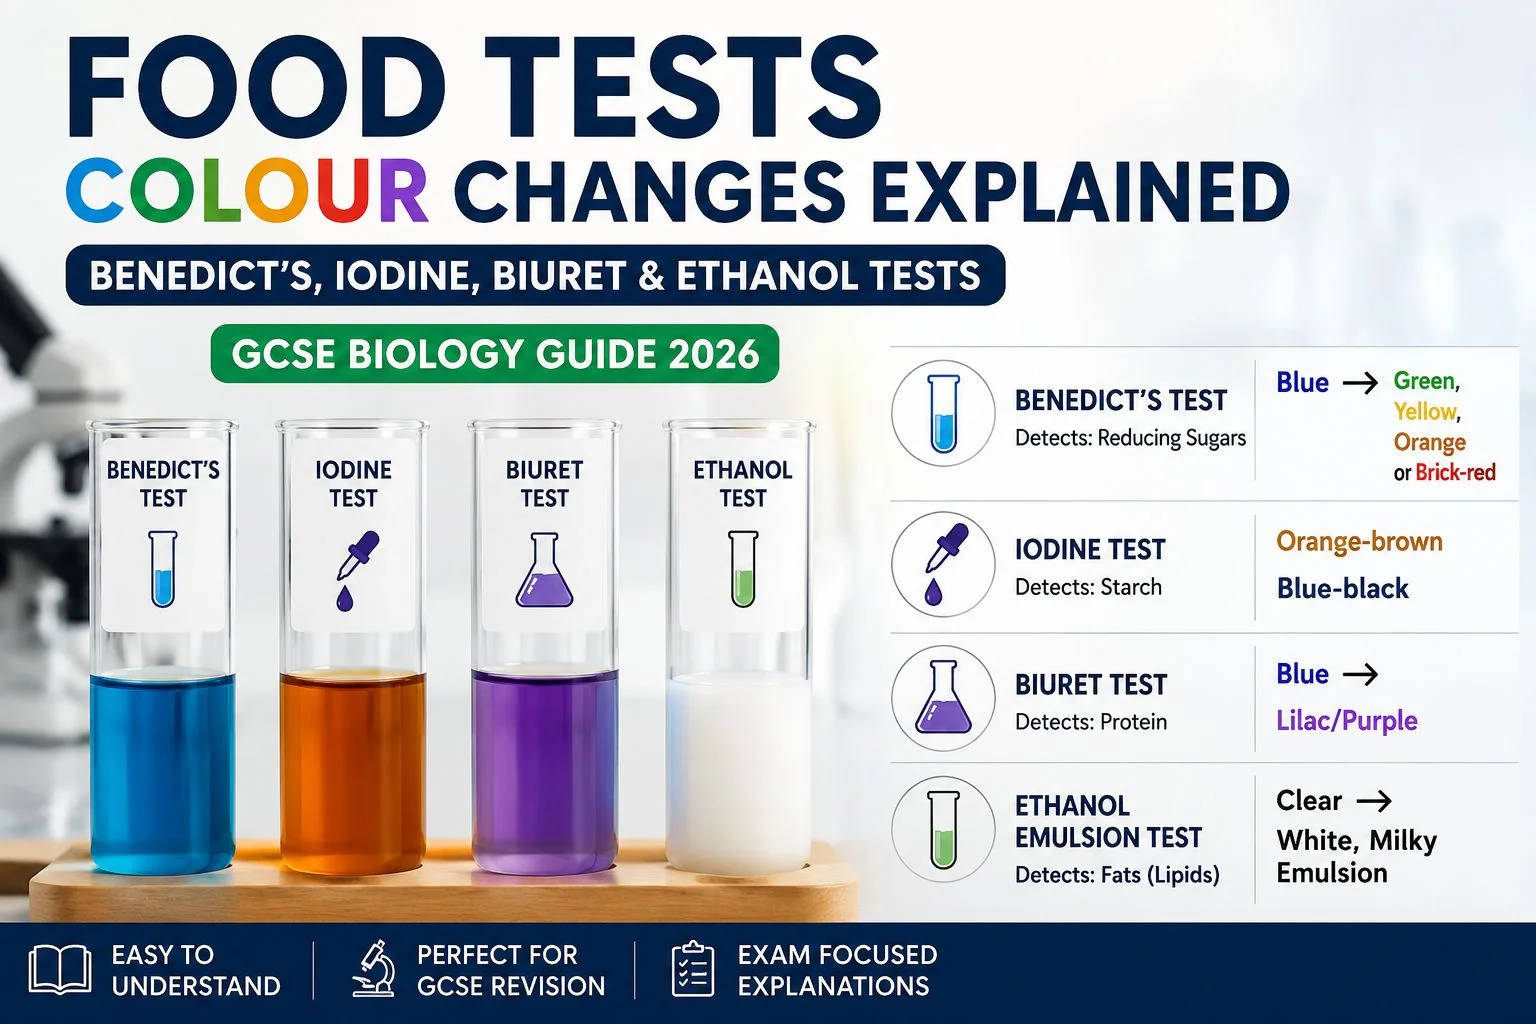
GCSE Biology uses four standard food tests. Benedict’s test turns from blue to green/yellow/orange/brick-red for reducing sugars (after heating). The iodine test turns from orange-brown to blueblack for starch. The Biuret test turns from blue to lilac/purple for protein. The ethanol emulsion test turns a clear mixture into a white, milky emulsion for lipids (fats). Understanding food tests and their colour changes is one of the most important practical skills in GCSE Biology. Whether you’re studying AQA, Edexcel, OCR, or Cambridge IGCSE, you’re expected to know how to identify different nutrients using simple chemical tests and to recognise the colour changes that indicate a positive or negative result. Many exam questions ask you to identify which food test to use, explain the method, or state the colour change observed. This guide covers the full method, the science behind each colour change, common mistakes, and exam-style practice questions with mark-scheme-style answers.
In this complete GCSE Biology guide, you’ll learn:
- What food tests are and why they are important
- How to prepare a food sample correctly
- Benedict’s Test for reducing sugars
- Iodine Test for starch
- Biuret Test for proteins
- Ethanol Emulsion Test for fats (lipids)
- Complete colour change tables
- Practical exam tips
- Common mistakes students make
- Revision techniques to help you remember each test
By the end of this guide, you’ll have everything you need to confidently answer practical questions in your GCSE Biology exams.
What Are Food Tests?
Food tests are simple laboratory investigations used to identify the presence of specific nutrients in food. Different nutrients react with different chemicals, producing distinctive colour changes or visible observations that help scientists determine what substances are present.
Colour Changes at a Glance(Mind Map)
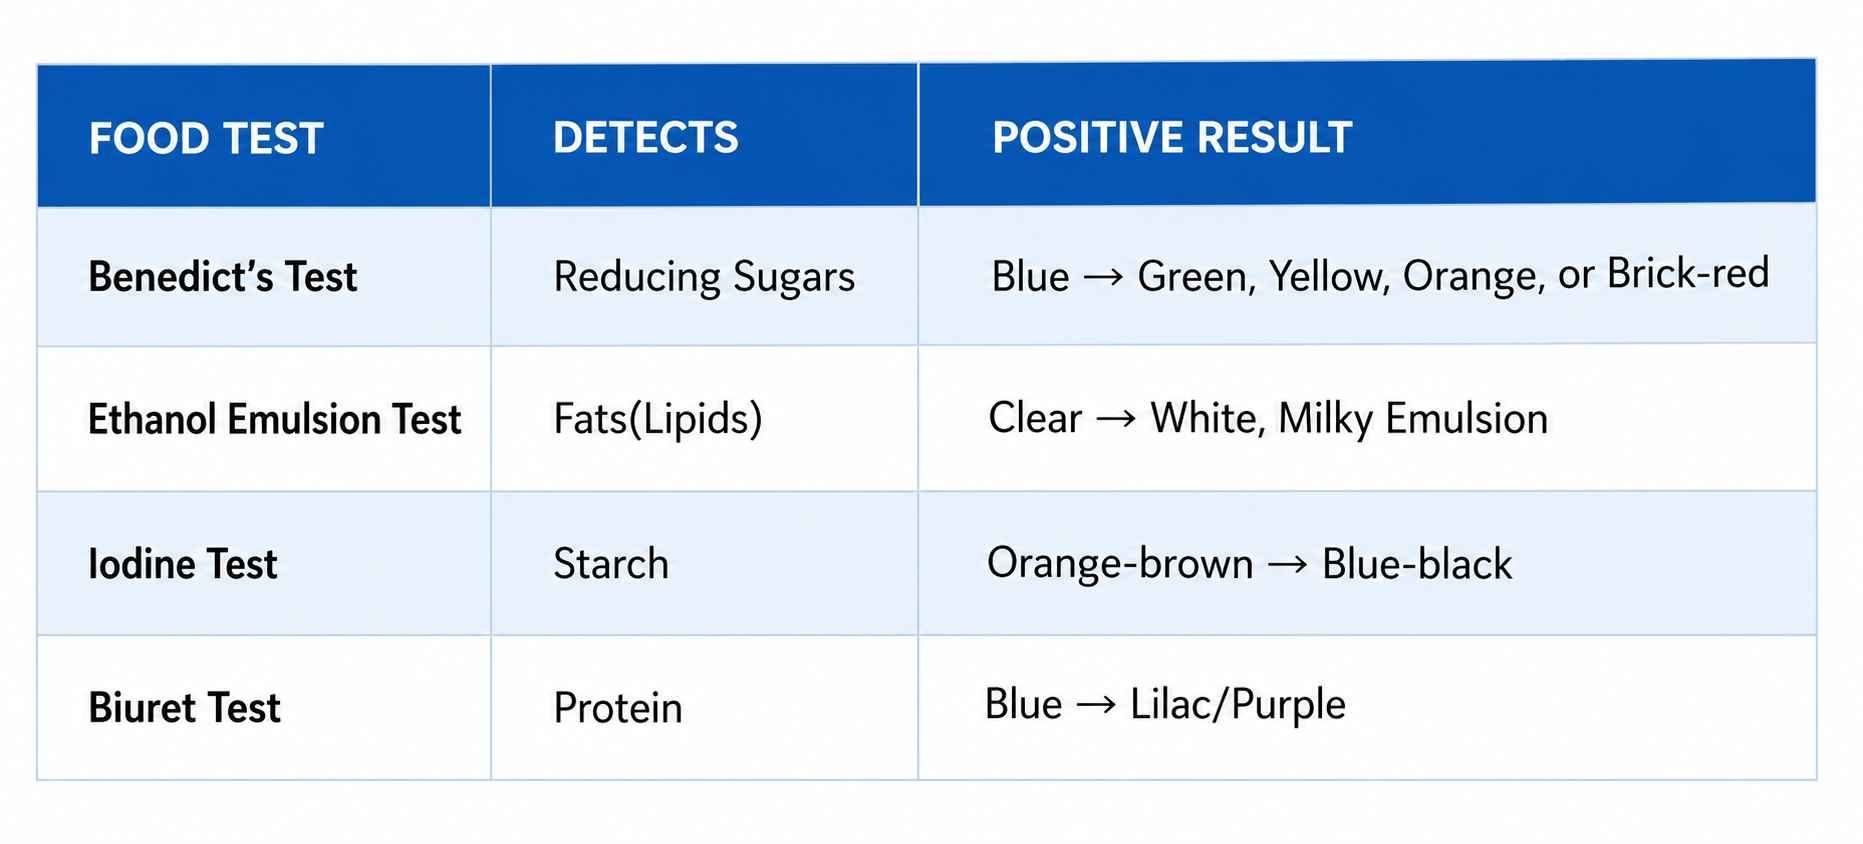
Each test is designed to detect one particular nutrient and has its own procedure. Learning both the method and the colour change is essential for practical exams.
The Four Main Nutrients Tested
Food contains many nutrients, but GCSE practicals focus on four important biological molecules.
1. Reducing Sugars
Reducing sugars are simple carbohydrates that provide quick energy for respiration.
Examples include:
- Glucose
- Fructose
- Maltose
- Lactose
These sugars can reduce copper(II) ions in Benedict’s solution when heated, producing a colour change.
2. Starch
Starch is a complex carbohydrate made from many glucose molecules joined together.
Plants store excess glucose as starch because it is insoluble and suitable for long-term energy storage.
Foods rich in starch include:
- Bread
- Rice
- Pasta
- Potatoes
- Cereals
3. Proteins
Proteins are essential for:
- Growth
- Tissue repair
- Enzyme production
- Hormones
- Muscle development
They are made from amino acids linked together in long chains.
Common protein-rich foods include:
- Eggs
- Meat
- Fish
- Milk
- Beans
- Lentils
4. Lipids (Fats)
Lipids are used for:
- Long-term energy storage
- Insulation
- Protecting organs
- Building cell membranes
Foods containing fats include:
- Butter
- Cheese
- Nuts
- Cooking oils
- Avocados
The ethanol emulsion test is used to detect these lipids.
Preparing a Food Sample
Before carrying out any food test, the food sample must be prepared properly to ensure accurate results.
Step 1: Crush the Food
Use a pestle and mortar to crush the food into small pieces.
This increases the surface area and allows nutrients to dissolve more easily.
Step 2: Add Distilled Water
Transfer the crushed food into a test tube.
Add approximately 5 cm³ of distilled water.
Distilled water is used because it contains no impurities that might affect the experiment.
Step 3: Mix Thoroughly
Shake or stir the mixture thoroughly so that nutrients dissolve into the water.
Step 4: Filter the Mixture
Pour the mixture through filter paper.
The liquid collected is called the food extract, which is used for the food tests.
Filtering removes solid particles that could interfere with observing colour changes.
Benedict’s Test for Reducing Sugars
What Does Benedict’s Test Detect?
Benedict’s test identifies reducing sugars, such as:
- Glucose
- Fructose
- Maltose
- Lactose
These sugars have the ability to reduce copper(II) sulfate present in Benedict’s reagent.
Apparatus Required
- Food extract
- Benedict’s solution
- Test tube
- Test tube holder
- Water bath
- Beaker
- Heat source
Benedict’s Test Method
Follow these steps carefully:
Step 1
Place about 2 cm³ of food extract into a clean test tube.
Step 2
Add an equal volume of Benedict’s solution.
The solution is blue before heating.
Step 3
Mix gently.
Step 4
Place the test tube in a hot water bath (approximately 75–95°C) for 2–5 minutes.
Do not heat the test tube directly over a flame.
Step 5
Observe the final colour.
Benedict’s Test Colour Changes
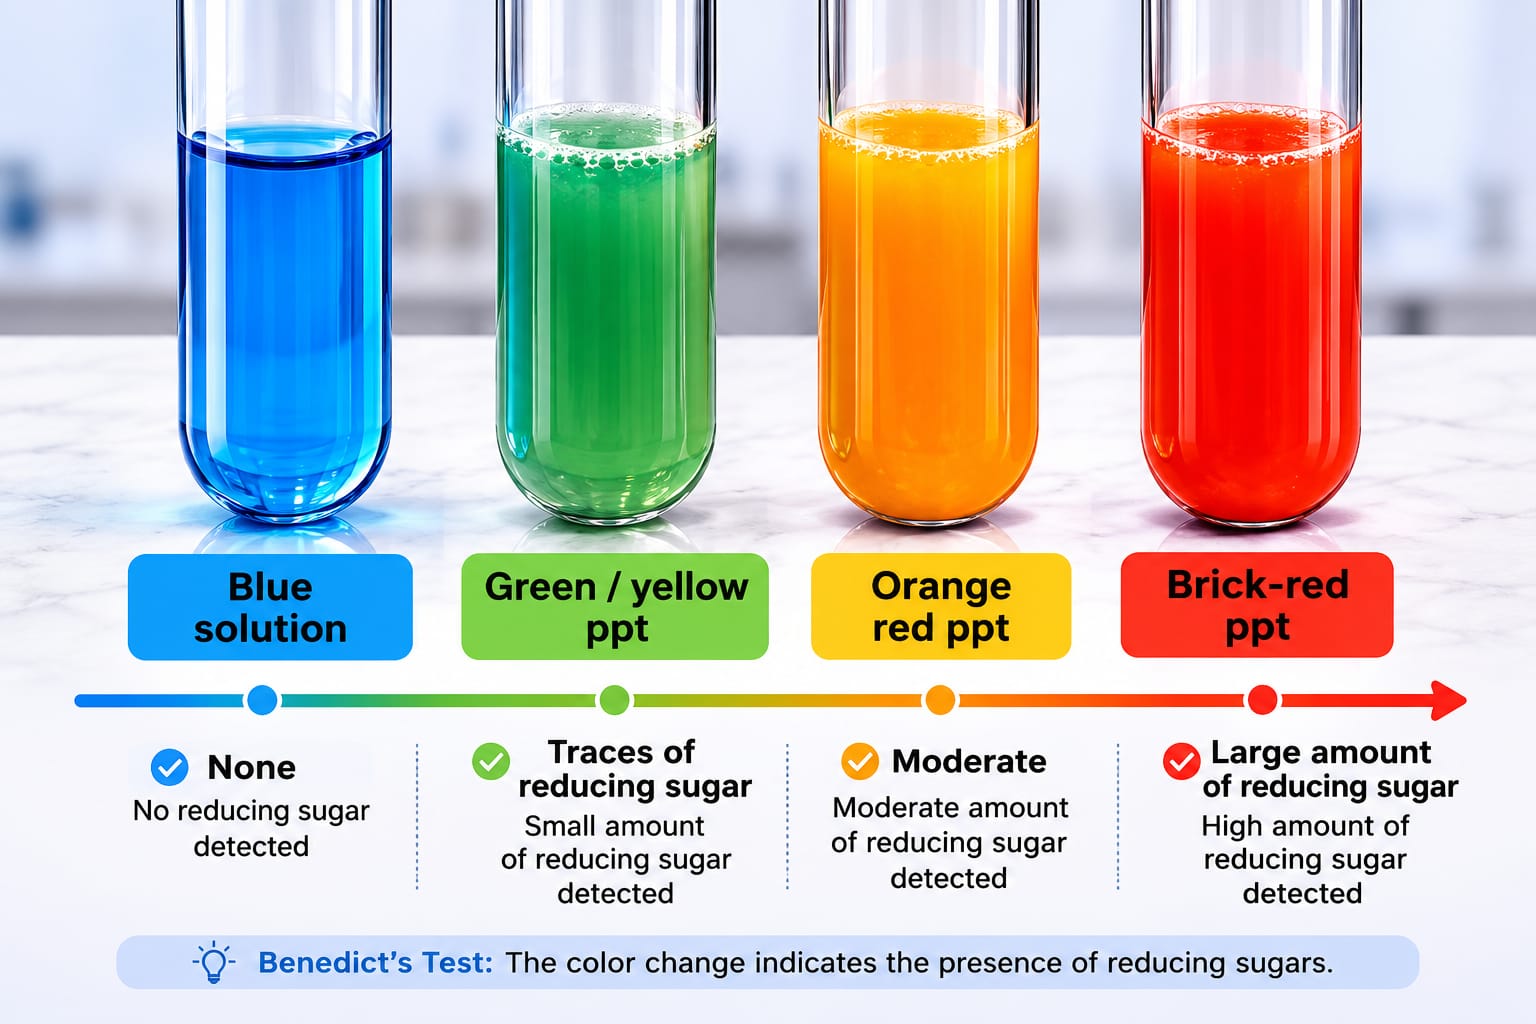
The colour depends on the amount of reducing sugar present.
| Colour | Result | Sugar Concentration |
| Blue | Negative | No reducing sugar |
| Green | Positive | Very low concentration |
| Yellow | Positive | Low concentration |
| Orange | Positive | Moderate concentration |
| Brick-red | Positive | High concentration |
The greater the concentration of reducing sugars, the warmer the colour becomes.
A brick-red precipitate indicates a high concentration of reducing sugars.
Positive Benedict’s Test
A positive Benedict’s test shows that reducing sugars are present.
The solution changes from:
Blue → Green → Yellow → Orange → Brick-red
depending on the concentration of sugar.
Negative Benedict’s Test
If no reducing sugars are present, the solution remains:
Blue
This indicates a negative result.
Why Does Benedict’s Solution Change Colour?
Benedict’s reagent contains copper(II) sulfate, which gives the solution its blue colour.
When heated with reducing sugars, copper(II) ions are reduced to copper(I) oxide, forming a coloured precipitate. As the amount of reducing sugar increases, more copper(I) oxide is produced, causing the solution to progress from green to yellow, orange and finally brick-red.
Iodine Test for Starch
What Does the Iodine Test Detect?
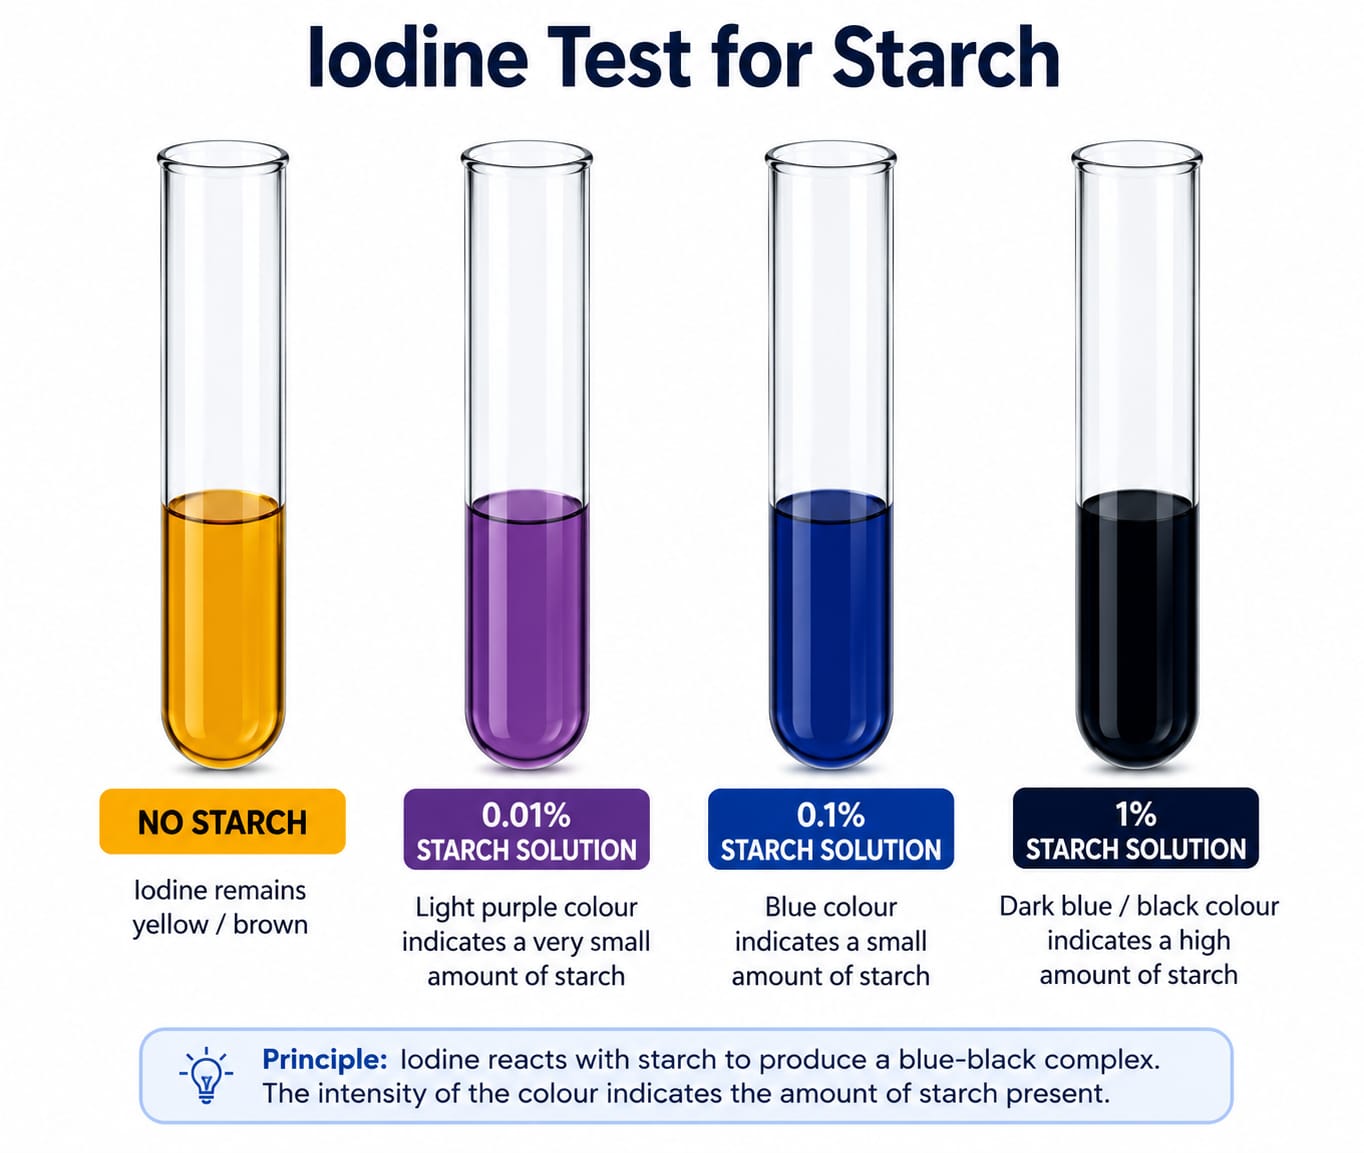
The iodine test is used to identify the presence of starch, a complex carbohydrate made up of many glucose molecules. Plants produce starch through photosynthesis and store it as an energy reserve. Because starch is insoluble in water, it is an ideal storage molecule for plants.
In GCSE Biology practicals, the iodine test is one of the simplest food tests to perform because it does not require heating.
Foods That Contain Starch
Some common examples of foods rich in starch include:
- Bread
- Potatoes
- Rice
- Pasta
- Cereals
- Crackers
- Corn
If these foods are tested using iodine solution, they will usually produce a positive result.
Apparatus Required
Before starting the experiment, gather the following equipment:
- Food extract
- Iodine solution (iodine dissolved in potassium iodide)
- Test tube or spotting tile
- Pipette or dropping pipette
Unlike Benedict’s test, no water bath or heating equipment is required.
Iodine Test Method
Follow these steps carefully to obtain accurate results.
Step 1
Place approximately 2 cm³ of the prepared food extract into a clean test tube or onto a spotting tile.
Step 2
Add 2–3 drops of iodine solution using a pipette.
Step 3
Gently mix the solution.
Step 4
Observe any colour change immediately.
The reaction occurs almost instantly.
Iodine Test Colour Changes
The colour change is very easy to remember.
| Initial Colour | Final Colour | Result |
| Orange-brown | Blue-black | Positive for starch |
| Orange-brown | Orange-brown | Negative for starch |
Positive Iodine Test
If starch is present, the iodine solution changes from:
Orange-brown → Blue-black
This indicates a positive result.
Negative Iodine Test
If starch is absent, the iodine solution remains:
Orange-brown
This indicates a negative result.
Why Does Iodine Change Colour?
Starch consists of two polysaccharides called amylose and amylopectin.
Amylose molecules form long, coiled chains. When iodine molecules enter these coils, they form a starch-iodine complex that absorbs light differently, producing the characteristic blue-black colour.
If starch is not present, no complex forms and the solution remains orange-brown.
Exam Tip
Many students mistakenly write black instead of blue-black.
For GCSE Biology exams, always write:
Blue-black rather than simply “black.”
Real-Life Applications of the Iodine Test
The iodine test is used in:
- Food laboratories
- School practical experiments
- Agriculture
- Food quality control
- Scientific research
Scientists use it to measure starch content in crops and food products.
Biuret Test for Proteins

What Does the Biuret Test Detect?
The Biuret test detects proteins.
Proteins are made from amino acids joined together by peptide bonds. The Biuret reagent reacts specifically with these peptide bonds, making it an excellent test for proteins.
Why Are Proteins Important?
Proteins play many essential roles in the body, including:
- Growth
- Muscle repair
- Enzyme production
- Hormone synthesis
- Cell structure
- Immune defence
Foods rich in protein include:
- Eggs
- Chicken
- Fish
- Milk
- Cheese
- Lentils
- Beans
- Nuts
Apparatus Required
You will need:
- Food extract
- Sodium hydroxide solution
- Copper(II) sulfate solution (or Biuret reagent)
- Test tube
- Pipette
Many schools provide Biuret reagent, which already contains the required chemicals.
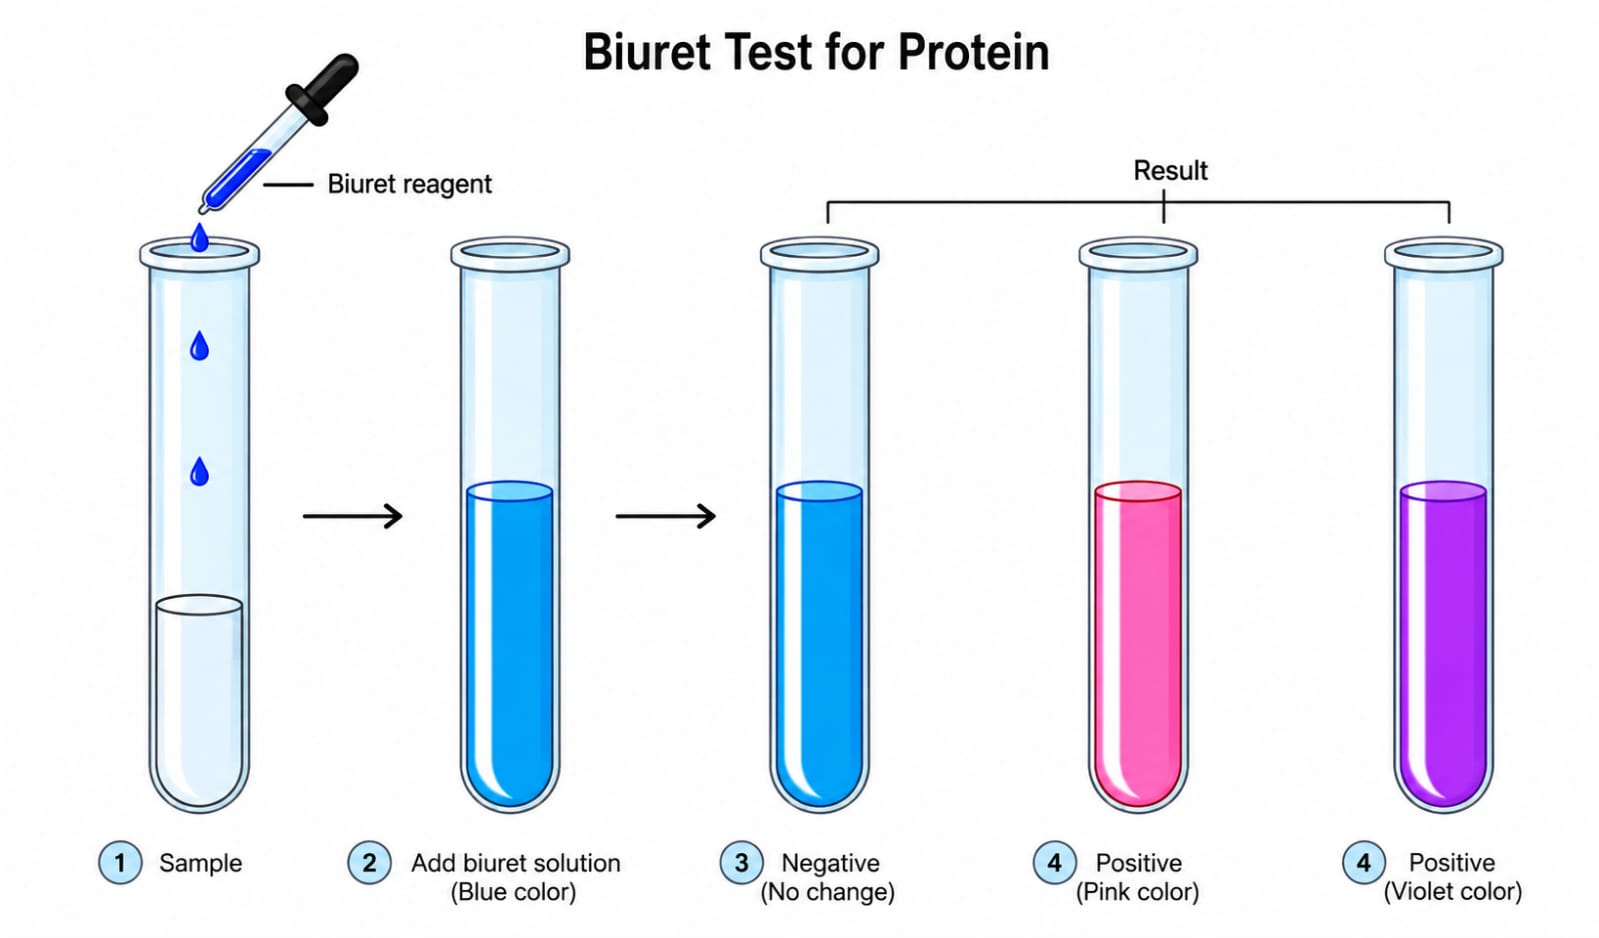
Biuret Test Method
Step 1
Add about 2 cm³ of food extract into a clean test tube.
Step 2
Add approximately 2 cm³ of sodium hydroxide solution.
Step 3
Add a few drops of copper(II) sulfate solution.
If using Biuret reagent, simply add the reagent directly.
Step 4
Shake the test tube gently.
Step 5
Observe the colour change.
No heating is required. Biuret Test Colour Changes
| Initial Colour | Final Colour | Result |
| Blue | Lilac/Purple | Positive for protein |
| Blue | Blue | Negative for protein |
Positive Biuret Test
If protein is present, the solution changes:
Blue → Lilac (Purple)
This confirms the presence of peptide bonds.
Negative Biuret Test
If protein is absent, the solution remains:
Blue
No colour change means there are no detectable proteins.
Why Does the Biuret Test Change Colour?
Proteins contain numerous peptide bonds linking amino acids together.
Copper(II) ions in the Biuret reagent react with these peptide bonds in an alkaline solution, forming a purple-coloured complex.
The stronger the purple colour, the greater the amount of protein present.
Common Foods That Give Positive Results
| Food | Expected Result |
| Egg white | Positive |
| Milk | Positive |
| Cheese | Positive |
| Chicken | Positive |
| Fish | Positive |
| Beans | Positive |
Ethanol Emulsion Test for Fats (Lipids)
What Does the Ethanol Test Detect?
The ethanol emulsion test detects lipids, commonly known as fats and oils.
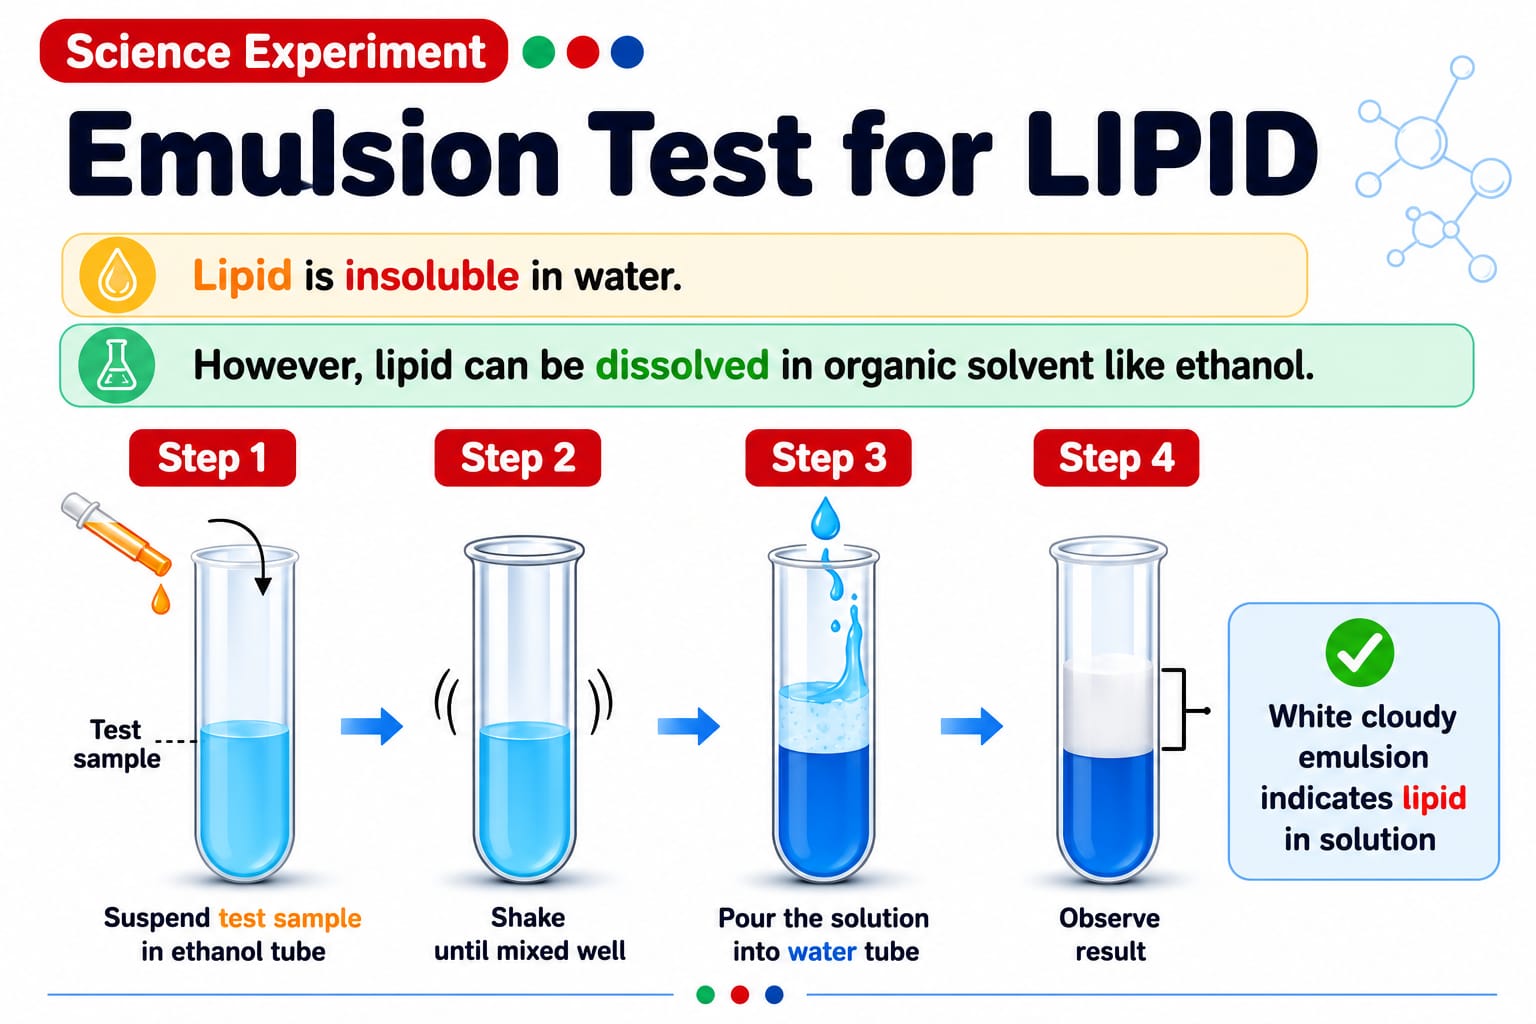
Unlike carbohydrates and proteins, lipids are insoluble in water but dissolve readily in ethanol. This property makes it possible to identify fats using the emulsion test.
Why Are Lipids Important?
Lipids are essential because they:
- Store energy over the long term
- Provide insulation
- Protect internal organs
- Form cell membranes
- Help absorb fat-soluble vitamins (A, D, E and K)
Foods rich in lipids include:
- Butter
- Cooking oil
- Cheese
- Nuts
- Avocados
- Cream
- Peanut butter
Apparatus Required
Prepare the following materials:
- Food sample
- Ethanol
- Distilled water
- Test tube
- Pipette
Ethanol Emulsion Test Method
Step 1
Place a small amount of the food sample into a clean test tube.
Step 2
Add approximately 2 cm³ of ethanol.
Step 3
Shake the test tube vigorously for about 30 seconds to dissolve any fats.
Step 4
Pour the ethanol mixture into another test tube containing distilled water.
Step 5
Observe the appearance of the liquid.
Ethanol Test Results
| Observation | Result |
| White, cloudy or milky emulsion | Positive for lipids |
| Clear solution | Negative for lipids |
Positive Ethanol Test
If fats are present:
Clear solution → White milky emulsion
This cloudy appearance confirms that lipids are present in the sample.
Negative Ethanol Test
If lipids are absent:
The solution remains clear and colourless.
No white emulsion forms.
Why Does the Emulsion Form?
Lipids dissolve easily in ethanol but do not dissolve in water.
When the ethanol-fat solution is poured into water, the dissolved fats separate into tiny droplets suspended throughout the liquid. These droplets scatter light, creating the characteristic white milky emulsion.
This physical change—not a chemical colour reaction—is what makes the ethanol test unique among the four GCSE food tests.
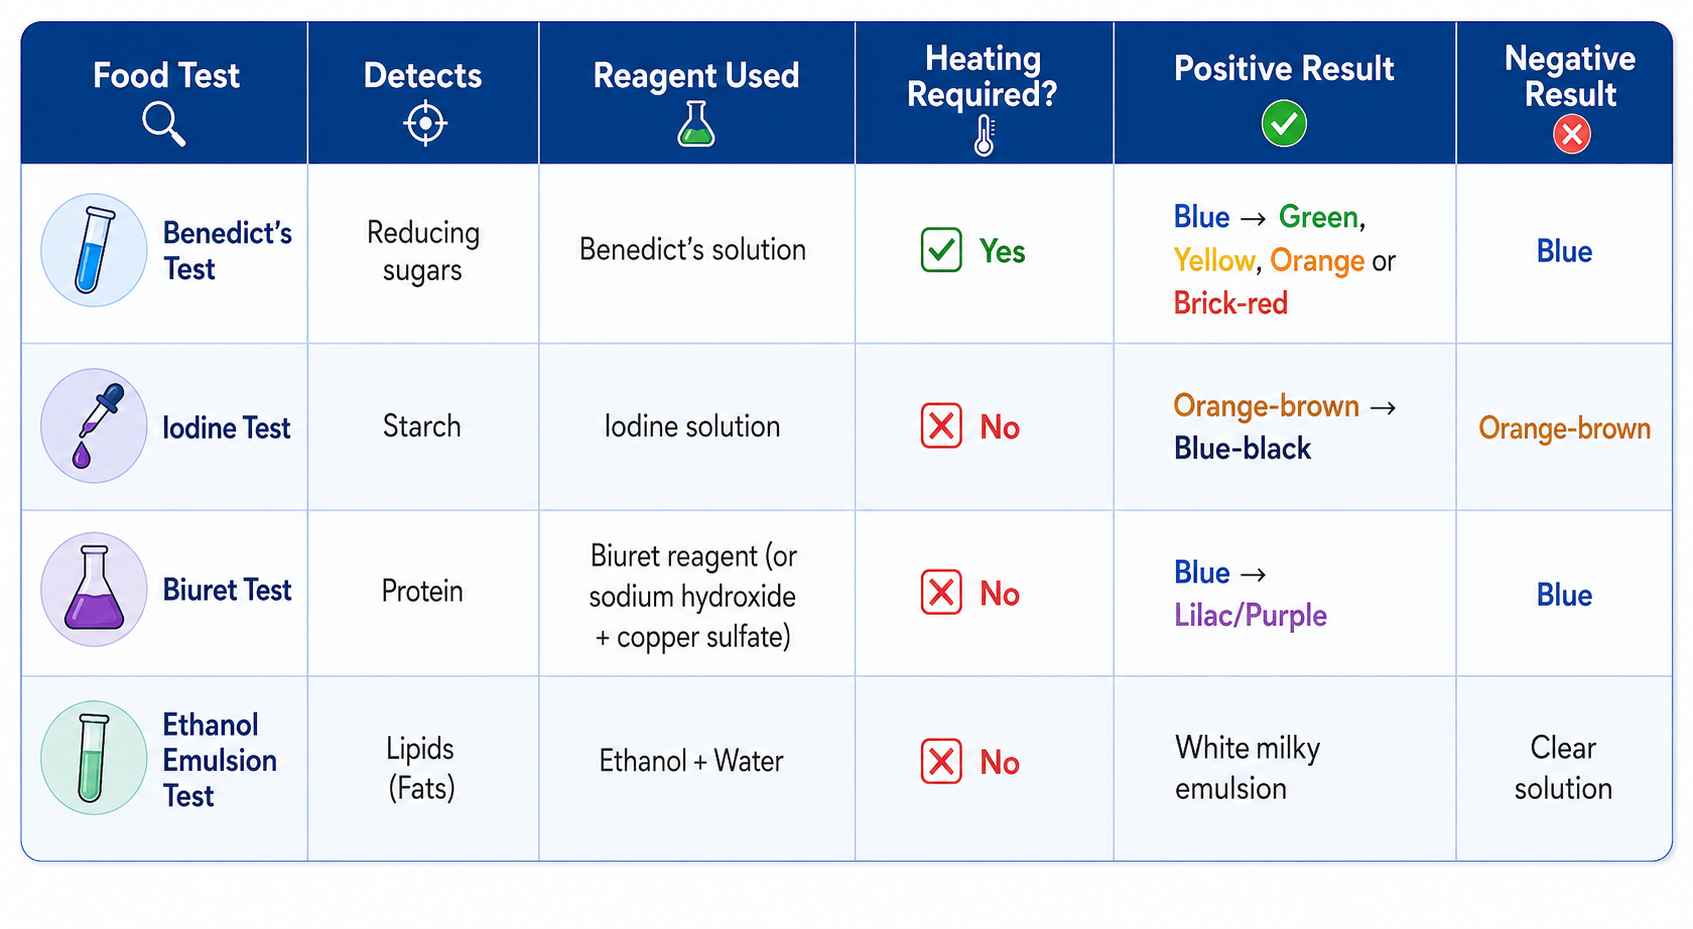
Comparing the Four Food Tests
The table below summarises the key information you need to remember for your GCSE Biology exam.
Common Mistakes Students Make in Food Tests
Food tests are a regular feature in GCSE Biology practical exams, but many students lose marks by making avoidable mistakes. Knowing what to watch out for can improve both your practical skills and your exam performance.
1. Forgetting to Heat Benedict’s Test
One of the most common mistakes is forgetting that Benedict’s test requires heating. The reaction only occurs when the mixture is heated in a hot water bath (approximately 75–95°C) for a few minutes. If the solution is not heated, it may remain blue even if reducing sugars are present.
Exam Tip: Remember that Benedict’s test is the only one of the four standard GCSE food tests that requires heating.
2. Heating the Test Tube Directly Over a Flame
Never heat Benedict’s solution directly using a Bunsen burner. Instead, place the test tube in a hot water bath. Direct heating can cause the solution to boil violently or crack the glass, making the experiment unsafe.
3. Using Dirty Equipment
Always use clean test tubes, pipettes and stirring rods. Residual chemicals from previous experiments can contaminate the sample and produce inaccurate results.
4. Confusing the Colour Changes
Many students mix up the colour changes for different food tests. Learning them together in a comparison table can help prevent confusion.
| Food Test | Positive Result |
| Benedict’s Test | Green, Yellow, Orange or Brick-red |
| Iodine Test | Blue-black |
| Biuret Test | Lilac/Purple |
| Ethanol Emulsion Test | White Milky Emulsion |
5. Forgetting the Negative Results
Exam questions often ask for both positive and negative results. For full marks, remember the negative observations:
- Benedict’s Test: Blue
- Iodine Test: Orange-brown
- Biuret Test: Blue
- Ethanol Test: Clear solution
6. Incorrect Sample Preparation
If the food sample is not crushed properly or mixed thoroughly with distilled water, the nutrients may not dissolve into the food extract. This can lead to false negative results.
Always prepare the food extract carefully before beginning any food test.
Safety Precautions During Food Tests
Following laboratory safety rules is an essential part of every practical investigation.
Some important safety precautions include:
- Wear safety goggles to protect your eyes from chemical splashes.
- Tie back long hair before starting practical work.
- Use a test tube holder when placing test tubes in a hot water bath.
- Avoid tasting or smelling chemicals.
- Handle ethanol carefully, as it is highly flammable. Keep it away from naked flames.
- Wash your hands thoroughly after completing the experiment.
- Dispose of chemicals according to your teacher’s instructions.
Good laboratory practice ensures reliable results while keeping everyone safe.
Memory Tricks to Remember the Food Tests
Many students find it difficult to memorise all four food tests and their colour changes. The following revision tips can make them much easier to remember.
Benedict’s Test
Think of a traffic light gradually turning warmer.
Blue → Green → Yellow → Orange → Brick-red
The warmer the colour, the more reducing sugar is present.
Iodine Test
Imagine writing with a blue-black ink pen.
Starch = Blue-black
Biuret Test
Remember:
Protein = Purple
Both words begin with the letter P.
Ethanol Test
Think of pouring milk into water.
If fats are present, you see a milky white emulsion.
Think of pouring milk into water.
If fats are present, you see a milky white emulsion.
Quick Revision Summary Table
| Nutrient | Test Used | Positive Result | Negative Result |
| Reducing Sugars | Benedict’s Test | Green, Yellow, Orange or Brick-red | Blue |
| Starch | Iodine Test | Blue-black | Orange-brown |
| Protein | Biuret Test | Lilac/Purple | Blue |
| Lipids (Fats) | Ethanol Emulsion Test | White Milky Emulsion | Clear |
Example GCSE Exam Questions
Question 1
Which food test is used to detect reducing sugars?
Answer: Benedict’s Test.
Question 2
What colour indicates a positive result in the iodine test?
Answer: Blue-black.
Question 3
Which food test requires heating?
Answer: Only Benedict’s test requires heating, in a hot water bath. The iodine, Biuret, and ethanol emulsion tests are all carried out at room temperature.
Question 4
What colour change occurs in the Biuret test if protein is present?
Answer: Blue to lilac (purple).
Question 5
What observation indicates that lipids are present after carrying out the ethanol emulsion test?
Answer: A white, cloudy or milky emulsion forms.
Frequently Asked Questions (FAQs)
Which food test requires heating?
Only Benedict’s Test requires heating in a hot water bath. The iodine, Biuret and ethanol emulsion tests are carried out at room temperature.
What does Benedict’s Test detect?
Benedict’s Test detects reducing sugars, such as glucose, fructose, maltose and lactose.
Why does Benedict’s solution change colour?
Reducing sugars react with copper(II) ions in Benedict’s solution when heated, forming copper(I) oxide. This causes the solution to change from blue to green, yellow, orange or brick-red depending on the amount of sugar present.
What does the iodine test detect?
The iodine test detects starch, changing from orange-brown to blue-black when starch is present.
Why is the Biuret test purple?
Copper ions in the Biuret reagent react with peptide bonds in proteins under alkaline conditions, producing a lilac or purple colour.
Why does the ethanol emulsion test become cloudy?
Lipids dissolve in ethanol but not in water. When water is added, tiny droplets of fat form a white, cloudy emulsion, indicating the presence of fats.
Can one food sample give positive results in more than one food test?
Yes. Many foods contain more than one nutrient. For example, milk contains proteins, fats and the reducing sugar lactose, so it can produce positive results in several food tests.
Exam-Style Practice Questions (with Answers)
Q1(3 marks). Describe how you would prepare a solid food sample, such as bread, for food testing.
Answer: Crush the food using a pestle and mortar (1 mark)
add distilled water and mix/stir thoroughly so nutrients dissolve into the water (1 mark)
filter the mixture using filter paper to obtain a clear food extract suitable for testing (1 mark).
Q2 (4 marks). A student tests a food sample with iodine solution and it stays orange-brown. They then test a second sample with Biuret reagent and it turns purple. Explain what these two results tell you about the food.
Answer: The iodine result staying orange-brown shows the sample does not contain starch (1 mark),
since a positive result would turn blue-black (1 mark).
The Biuret result turning purple shows the sample does contain protein (1 mark),
because Biuret reagent turns from blue to purple/lilac in the presence of peptide bonds (1 mark).
Q3 (3 marks). A student is given an unknown liquid food sample and told it may contain starch, protein, or both. Describe a test they could carry out and the result that would indicate both nutrients are present.
Answer: Test a portion of the sample with iodine solution and a separate portion with Biuret reagent (1 mark).
A colour change from orangebrown to blue-black in the iodine test would indicate starch is present (1 mark).
A colour change from blue to lilac/purple in the Biuret test would indicate protein is present (1 mark).
Key Takeaways
Before your GCSE Biology exam, make sure you can confidently:
- Explain the purpose of each food test.
- Identify which nutrient each test detects.
- Describe the correct practical method.
- State whether heating is required.
- Recognise both positive and negative results.
- Recall all colour changes accurately.
- Explain why each colour change occurs.
- Follow laboratory safety procedures.
Mastering these points will help you answer both practical and theory-based questions with confidence.
Conclusion
Food tests are a fundamental part of GCSE Biology practical work and provide an excellent example of how scientists identify different nutrients using simple chemical reactions. By understanding the purpose of each test, following the correct method and remembering the characteristic colour changes, you can confidently tackle practical investigations and exam questions.
To recap:
- Benedict’s Test detects reducing sugars and changes from blue to green, yellow, orange or brick-red after heating.
- Iodine Test identifies starch with a blue-black colour change.
- Biuret Test detects proteins by turning lilac or purple.
- Ethanol Emulsion Test confirms lipids by producing a white milky emulsion.
Rather than simply memorising these reactions, aim to understand why they occur. This deeper understanding will help you interpret unfamiliar questions, analyse practical results and achieve higher marks in your GCSE Biology examinations.
Regular revision, practising past paper questions and carrying out these practical investigations in the laboratory will reinforce your knowledge and build confidence for exam day.